loading.gif
Notes
Login Sign Up Shopping Cart 简体中文
Add to my favorite categories
category Sunny
Path Yahoo Bid > Automotive > Catalogues & Brochures > Nissan > Sunny
Remarks
Add my favorite keywords
Keywords
category Sunny
Remarks
Join my favorite seller
Seller FZSHu***
Remarks
Add to my blacklist seller
Seller FZSHu***
Remarks
Yahoo Bid Automotive Catalogues & Brochures Nissan Sunny
【エンジンOH】A14型エンジン 分解 全バラ レストア 組み付け 日産B310サニー★エンジンOHの掟 オートメカニック 1995年6月号★旧車 絶版車
     

  • Product Quantity
    : 1
  • Starting Bid
    :4,980円
  • Highest Bidder
    : / Rating:
  • Listing Date
    :2025年07月14日 18時14分
  • Bidding closes on
    :2025年07月20日 18時14分
  • Auction Number
    :f1154258706
  • Condition
    :Damaged and stained (specify in description)
  • Automatic Extension
    :Yes
  • Authentication
    :Yes(Description)
  • Early Closing
    :Yes
  • Can I return the product?
    :no
  • Description
  • Q&A ()
  • Cost Estimator
  • Problem Item Response Procedur
Notes
  1. The seller does not provide return compensation and other responsibilities
  2. The remittance needs to be completed within the time required by the seller
  3. We cannot assist in shipping and purchasing steering wheels that contain airbags. If they do not contain airbags, press Confirm to place a bid.
【エンジンOH】A14型エンジン 分解 全バラ レストア 組み付け 日産B310サニー★エンジンOHの掟 オートメカニック 1995年6月号★旧車 絶版車
商品説明商品に興味をもっていただき、誠にありがとうございます。

◎「オートメカニック 1995年6月号」になります。
1995年6月 内外出版社発行
定価550円
本文約242ページ
横18cm×縦25.5cm×厚1.0cm
重量360g

◎管理番号 1906138

◎コンテンツ
*記事が多いので気になった箇所をピックアップしています
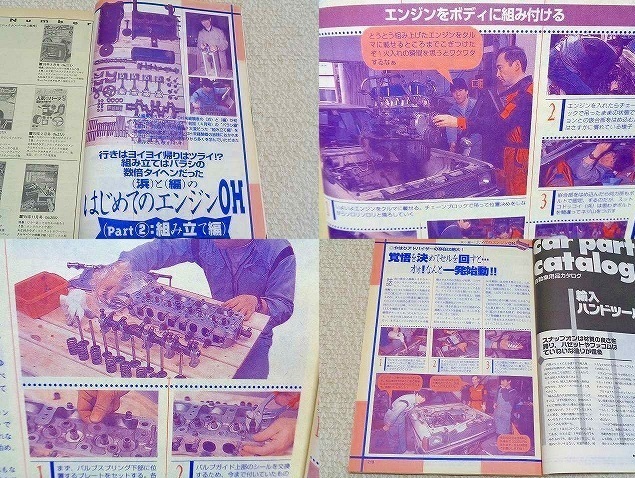
★はじめてのエンジンOH/組み立て編
・モデルエンジン/日産A14型
・モデル車両/B310サニー
・組み立て前に揃える必需品
・消耗パーツ
・OHキット
・整備要領書/日産A型エンジン
・トルクレンチ
・バルブスプリングコンプレッサー
・ピストンリング押し込み用SST
・ピストン、クランクまわりからスタート
・ピストンにピストンリングを装着する
・ピストンリングがシリンダーに合っているかをチェックする
・ピストンを使ってリングのギャップをみる
・オイルリングの上下にセットするシールリングに注意する
・ピストンリングの上下を識別するマーク
・取り外した古いリングでリングの溝のカーボンを清掃する
・オイルリングの後はNO.2コンプレッションリングを装着する
・エンジンOHの掟/その1
・ピストンリングの組み付け
・リングにねじれの力がかかってしまうと
・パリンとリングは欠けてしまう
・ねじれの力がかからないように平行に開いて装着する
・ピストンリング装着用SST/お手製
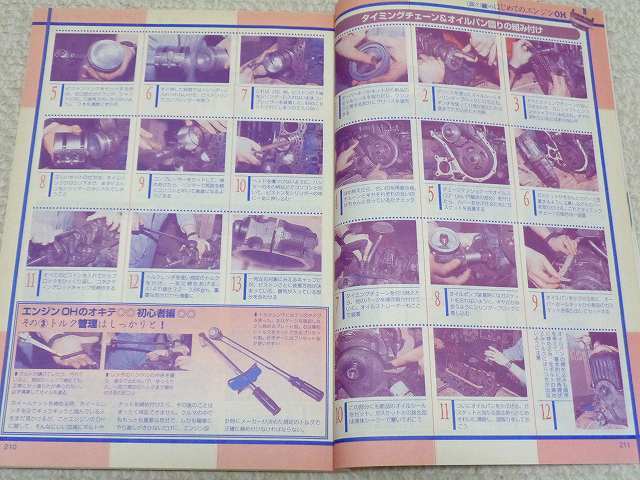
・シリンダーブロックにピストン、クランクを組み付ける
・クランクシャフトのメタルを取り付ける
・エンジンオイルを塗布する
・ブロックにクランクシャフトをセットする
・ベアリングキャップを装着する
・同様にエンジンオイルを塗布する
・ボルト類は丁寧に清掃する
・規定の締付トルクで締める
・締める前に1/2トルクレンチで仮締めする
・途中で手を止めないで
・ゆっくりと1回のアクションで締め付けを終える
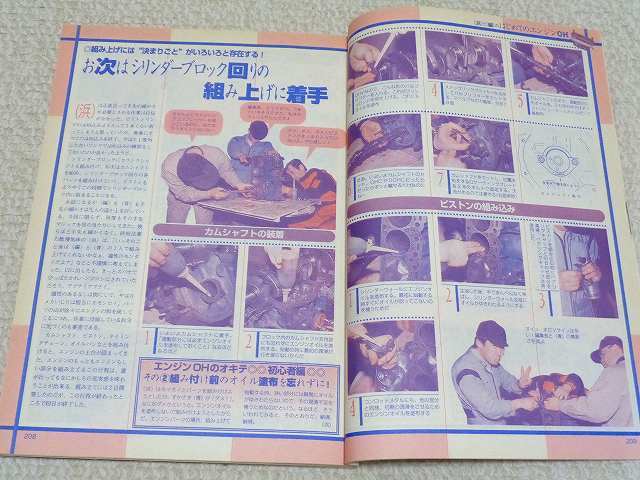
・シリンダーブロックまわりの組み上げ
・カムシャフトの装着
・摺動部分にエンジンオイルを塗布する
・ブロック内のカムシャフト支持部にも
・エンジンオイルを塗布する
・エンジンOHの掟/その2
・組み付け前のオイル塗布を忘れない
・始動の時に最初の潤滑が行き渡らないため
・バルブリフターにもオイルを塗布する
・スナップリングプライヤーを活用して
・バルブリフターをセットする
・全部で8個
・カムシャフトのギヤ、摺動部分にもオイルを塗布する
・カムシャフトをセットする
・ロケーティングプレートを2本のボルトで固定する
・天地があるので注意する
・ピストンの組み込み
・シリンダーウォールにオイルを塗布する
・ベアリングキャップとの合わせ部分を清掃する
・ベアリングキャップは再使用した
・コンロッドメタルにもオイルを塗布する
・ピストンリングをセットする時は
・合口部分がクランクシャフトに対して
・直角方向にならないように3本を適度にずらす
・ピストンリングコンプレッサーを使用する
・オイルリングの10mm下まで
・先ずピストンをシリンダーの中に入れてしまう
・コンプレッサーをセットして締め上げる
・ハンマーで周囲を軽く叩いて垂直になるようにする
・ピストンをシリンダーの中に一気に押し込む
・すべてのピストンを入れてからブロックをひっくり返す
・コネクティングロッドキャップを仮締めする
・トルクレンチを使って規定のトルクをかけて一気に締めあげる
・A14型エンジンの場合3.2〜3.8kgm
・キャップはピストンごとに装着方向が決まっている
・番号が入っている部分を合わせる
・エンジンOHの掟/その3
・トルク管理はしっかりと
・ボルトが錆びていたり汚れていると
・規定のトルクで締めても正常な引っ張り力が得られない
・清掃してオイルを塗布する
・トルクレンチのハンドルの中央を握り
・途中で止めないでゆっくりと1回で規定のトルクまで締め付ける
・2種類のトルクレンチ
・プレート型とプリセット型
・タイミングチェーン、オイルパンまわりの組み付け
・新品のオイルシールを取り出す
・クランクと接する部分にグリースを塗布する
・シリンダーブロックに打ち込む
・ポンチを使って打音が変化したら底まで打ち込んだと判断する
・ギヤとタイミングチェーンの合い印を合わせる
・カムシャフトとクランクシャフトにはめ込む
・チェーンテンショナーやオイルスロアを取り付ける
・ガスケットを装着する
・カバーを取り付ける
・オイルストレーナーを装着する
・オイルポンプを装着する際にはガスケットを忘れない
・シリンダーブロックに差し込む
・新品のガスケットをセットする
・新品のオイルシールをセットする
・液体シーラーで塞いでおく
・オイルパンをかぶせる
・ボルトは対角線上に締め込む
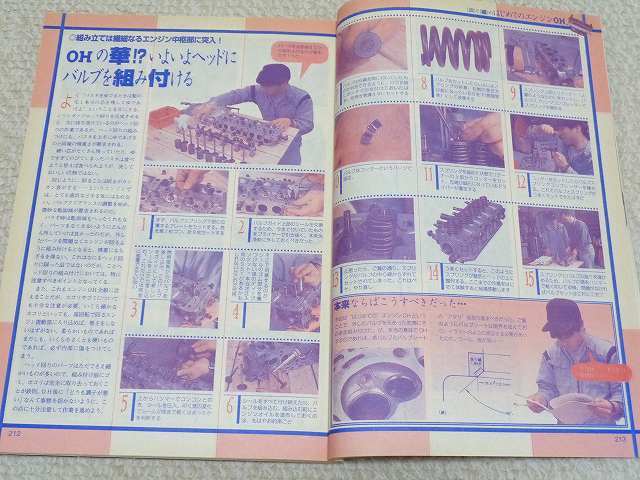
・ヘッドにバルブを組み付ける
・バルブスプリング下部に位置するプレートをセットする
・各気筒2枚づつ、計8枚セットする
・バルブガイド上部のシールを交換するためプライヤーで引き抜く
・燃焼室側からバルブを差し込む
・新しいシールを上から差し込む
・ディープソケットを代用する
・ハンマーで叩きシールを圧入する
・バルブを組み込む
・エンジンオイルを塗布する
・バルブは気筒を間違えずにセットする
・スプリングは巻き方が密になっている方を下側(燃焼室側)にしてセットする
・スプリング上部にリテーナーをセットする
・バルブスプリングコンプレッサーでスプリングを縮める
・バルブはコッターで固定する
・バルブスプリングコンプレッサーを緩める
・バルブとスプリングがセットできる
・本来ならば各バルブとバルブシートのアタリを取り直すべき
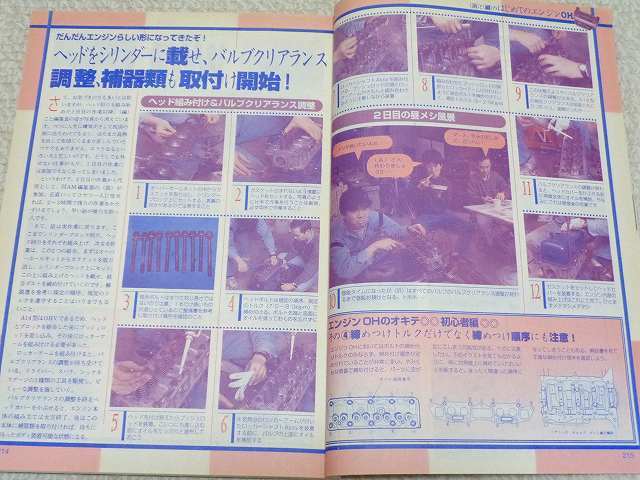
・ヘッドをシリンダーに載せる
・バルブクリアランス調整
・補機類の取り付け
・ヘッド組み付け、バルブクリアランス調整
・新品のガスケットをシリンダーブロック上にセットする
・裏表の向きがあるので注意する
・ガスケットがズレないように両手でヘッドをセットする
・結合ボルトは全て同じ長さではない
・1本だけ長いものが混じっている
・ヘッドボルトは規定の順序、規定のトルク(7.0〜8.0kgm)で締め付ける
・ボルト先端と座面にオイルを塗布する
・ブッシュロッドを装着する
・差し込む前にオイルを塗布する
・バルブの上面にオイルを補給する
・ロッカーアームAssyを組み付ける
・結合ボルトを規定のトルク(2.0〜2.5kgm)で締め付ける
・この状態でバルブクリアランス調整ができる
・規定のクリアランスは0.35mm
・ヘッドカバーをかぶせる前に全体にオイルを補給する
・ガスケットをセットしてヘッドカバーを装着する
・エンジンOHの掟/その4
・締め付け順序に注意する
・やみくもな順番で締め付けるとパーツに歪みが生じる可能性がある
・整備要領書をみて正確な締め付け順序を確認する
・エンジンをボディに収める
・マニホールド、フライホイール、補機類の取り付け
・クランクシャフトにフライホイールを取り付ける
・クラッチ板を取り付ける
・カバーをかぶせる
・フューエルポンプを取り付ける
・ガスケットをセットする
・EXマニホールドを取り付ける
・INマニホールドを装着する
・エンジンをボディに組み付ける
・チェーンブロックで吊って位置決めをする
・ミッションとの結合部をはめ込む
・配線を組んでいく
・エアクリーナーケースを取り付ける
・点火時期を合わせるため
・クランクプーリーの切り欠きを上死点前7”に合わせる
・デスビの回転角も
・切り欠き部分とポッチ部分を合わせて調整する
・デスビをエンジン本体に装着する
・ラジエターに冷却水を入れる
・エンジンオイル/10W-50
・elf高性能化学合成オイルF1
・新品プラグをセットする
・A14型エンジンは1発始動した
・A14型エンジン搭載車例
・B210型系サニー/1973年〜1977年
・B310型系サニー/1977年〜1980年
・C120型系バネット/1978年〜1980年
・F10型チェリー/1974年〜1978年
・N10型系パルサー/1978年〜1982年
・サニートラック/1972年〜2008年
◎AE86クラブ/AE92のインマニをFR用に改造
・FF用インマニはスロットルの向きが逆だった
・インマニの取り外しと切断
・スロットル取り付け部を溶接

◎オーバーホールとは?
(トヨタによる定義)
指示されたアッセンブリー部品の点検、調整、修理を目的に、全部品の機能が点検できるまでに分解し、全部品を点検のうえ新部品または旧部品を用いて正規の機能状態に組付け、必要な調整を行う作業。

◎詳細
「はじめてのエンジンOH/組み立て編」については2色カラー16ページに渡って特集されています。連載企画の第2回目です。モデル車両はB310サニーで、モデルエンジンは日産A14型エンジンです。A14型エンジンの組み付け作業工程が、写真付きで詳しく解説されています。エンジン組み付け時の注意点としてエンジンOHの掟と称したきめ細かい解説ヒントが記述されています。オーナー様やプロ業者様などにおススメの内容になっています。

◎おススメ記事
「AE86クラブ/AE92のインマニをFR用に改造」ではモノクロ4ページにわたって特集されています。AE92のインマニをFR用に改造する作業等について写真付きで詳しく解説されています。ハチロクオーナー様やプロ業者様におススメの内容となっています。

◎商品の状態
表紙や裏表紙、本文中の色焼けや経年相応の使用感はあります。切れや破れなどの致命的な損傷はありません。書き込みなども見受けられませんでしたが、見落としなどあるかもしれませんので予めご了承ください。
注意事項◎お支払いは「ヤフーかんたん決済」のみとさせていただきます。
予めご了承ください。

◎かんたん取引なので落札後は必要事項の入力からお取引を開始願います。

◎中古に理解のある方のみ入札よろしくお願いします。新品状態をお探しの方は入札をお控えくださいますようお願い致します。

48時間以内のご連絡と3日以内の決済が可能な方のみご入札よろしくお願いします。

◎現状渡し、保証なし、ノークレーム・ノーリターンとさせていただきますので予めご了承ください。

◎できるだけ迅速な対応を心がけておりますが、発送にお時間がかかることもございますので予めご了承ください。

◎まとめて取引については、2冊まで対応させていただきます。サイズや重量の関係でレターパックライト(370円)や、ゆうパック(60サイズ)、その他の発送方法になることがあります。予めご了承ください。
発送詳細発送方法は、こちらの1点のみとさせていただきます。
◎クリックポスト 185円 (茶封筒、郵便受け投函、保証なし、追跡有り)
支払方法Yahoo!かんたん決済
こちらの商品案内は 「■@即売くん5.20■」 で作成されました。

The
この他にも出品しておりますので宜しければご覧ください。


Please log in before asking questions
Question list
All replies from original sellers (total number of questions: items)
After the seller responds, the original page will display the question
Product Price JPY
Japanese Consumption Tax(10%) JPY

A 10% consumption tax is applied to goods and services in Japan. The price may include the tax or it may be added separately. Please check the price details when ordering.

Note: This is a domestic sales tax applied within Japan.

Japan Local Shipping Fee JPY Japan Local Shipping Fee Reference
Product Weight KG The maximum weight limit is 30 kg
International Shipping Methods Get Your Limited-Time International Shipping Discount Now!
Proxy bidding and purchasing services are becoming increasingly convenient. However, overseas shopping carries certain risks and issues. To reduce these risks and enhance shopping safety, please be sure to read the following information:

1. International Shipping

   Air Freight: If the item status is not confirmed within two days after the arrival notice, any customer complaints cannot be addressed with the seller.

2. After Receiving the Product

Please confirm and inspect the product as soon as possible to ensure that the product specifications, quantity, accessories, and description are correct

If, unfortunately, there are any issues, you can refer to the following examples on how to report related product problems:
1. Example of missing product information
2. Example of product not matching provided information
3. Example of damaged product information

Important Notes: 1. If the seller is unwilling to ship overseas or is unaware that the product will be shipped overseas, the international shipping cost for returns or exchanges will need to be borne by the member. You may refer to the EMS e-Express fee inquiry from the post office. If it involves alcoholic beverages or items that affect flight safety, the post office cannot be used for shipment, and only DHL can be used to ship back to Japan.
2. During the product complaint handling period, please retain the complete outer packaging of the product (including the shipping label information), and refrain from attempting any repairs or altering the original condition. Any modifications may result in the inability to process the case.

3. After Inspecting the Product

After receiving and inspecting the item, if you have any questions, it is recommended to contact Letao within 2 hours. Here are some reminders:

1. Please do not unpack, use or repair the received item yourself, and be sure to keep the original packaging to facilitate subsequent handling of related matters, so as to avoid changes to the item that may cause the seller to be unwilling to process.

2. You can call customer service, and the customer service will leave a message for you as below. Please provide the following information:
"Hello, we will first help you establish a complaint case for Product ID: _______ .But we need you to 2-3 clear photos of the product issue, including photos of the product problem, product packaging, shipping details slip, and outer box. Send them to service@letao.my and inform us of your desired resolution (failing to provide this may result in an inability to process subsequent matters). After sending the email, notify us in the customer service message. We will confirm with the seller as soon as possible. and if there are any related questions, we will contact you through the customer service message. Thank you for your cooperation."

Please provide:
1. "Product ID"
2. Photo of the "Delivery Note" (if any)
3. Photos of the outer box (including inner and outer packaging)
4. Photos of the product (Please include relevant descriptions to help us confirm with the seller)

Important Notes:
1. Do not include foreign text or other products in the background of the image.
2. Please keep the complete product packaging (including the shipping label information), and refrain from repairing or altering the original condition on your own, as any changes may result in the case being unable to be processed.
3. Please provide the relevant information within 48 hours to avoid missing the golden hour for reflection and causing situations that cannot be handled.
4. Due to 99% of Japanese sellers being unwilling or unaware of shipping goods overseas, if a seller is willing to handle the issue, the goods must be sent back to Japan, and the international shipping costs incurred must be borne by the member. Letao will use postal EMS international express to send the goods back to Japan.
5. As the goods are purchased from overseas, it may take approximately one to two weeks to complete the relevant processing procedures when issues arise with the goods. Please be reminded that you can inquire about the approximate cost through the EMS service at the post office.

4. FAQ

1. Issue of Authenticity: If antique or branded goods are found to be counterfeit upon receipt, clear photos showing the differences between the genuine product and the imitation must be provided as evidence. If unable to provide relevant proof, assistance can be sought to find a third-party reputable organization for a premium authentication service .
2. Leaking Iron Teapot: If an antique iron teapot is leaking, please take clear photos of the leaking area and provide them.
3. Transport Damage: If the goods are damaged during international shipping (to the pickup point), you need to provide photos of the outer packaging of the parcel and clear photos of the damaged goods' outer packaging.

※ Note: Photos provided to sellers should not contain any foreign-related information.
You may also like
    Seller products
    Excite Translate
    Add to watchlist and notes
    Product name: 【エンジンOH】A14型エンジン 分解 全バラ レストア 組み付け 日産B310サニー★エンジンOHの掟 オートメカニック 1995年6月号★旧車 絶版車
    Notes:
    Customer service hours:
    • Monday to Friday 10:00-18:00
    Customer Service Email: service@letao.my